kde plasma 5: how to add and remove panels in the desktop
If you are using the latest KDE desktop, which is Plasma 5 then you have the ability to add multiple panels to your desktop. The panels in KDE (as with most other desktop environments) have the ability to hold different widgets that allows you interact with the system better and faster.
The desktop in KDE is based on two different types of concepts: Widgets and Containments (or Containers). The widgets are applications that can live on the desktop and perform some (or many) tasks or functions, while the containments are containers that can hold these widgets. Both the widgets and containments are sometimes also referred to as applets.
There are essentially two different types of Containments in KDE : the Desktop and the Panel. You can any number of panels in the desktop. We will see how you can add and delete panels from the desktop.
Add a Panel
In order to add a new panel to the desktop, right click anywhere on the desktop to get the pop up menu. You will see the menu entry to add a new panel in the popup. There are three options or three types of panel that you can add: Application Menu Bar, Default Panel and Empty Panel.

Application Menu Bar: This panel contains the widget that displays the menu bar for current application in focus.
Default Panel: This panel contain several different widgets that you might need, like the Startup Menu, Task Manager, System Tray, Clock etc.
Empty Panel: An empty panel with no widget that you can add any widget to.
So, in the menu you select Add Panel and then the type of panel you want to add. This will create a new panel either at the top or bottom of your desktop. Now, you can customize this panel to suit your needs. In order to customize it, you have to click on the hamburger menu icon at the right of the panel. This is the icon that looks like three short horizontal lines.
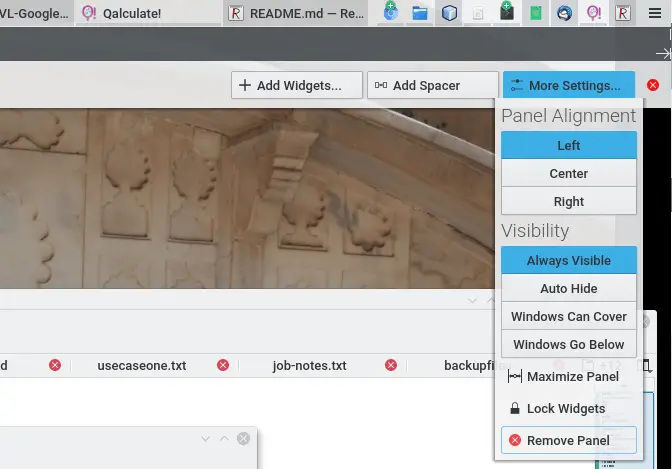
Clicking on the hamburger menu will open the draw out menu, that allows for several different operations on the panel such as the adjusting the width and height, adding widgets, panel alignment, visibility and so forth. You can also drag the panel to another location on the desktop.

Once you have configured and customized your panels, you can lock the widgets so as not change them accidently. To do that, right click anywhere on the desktop and select the Lock Widget menu or you can use the keyboard shortcut Alt+D and L.
Delete a Panel
In order to delete a panel, you will need to first unlock the widgets from the desktop. You can do that by right clicking on the desktop and selecting the Unlock widget option or use the shortcut Alt+D and followed by L. Once you have unlocked the widgets, click on the hamburger menu to open the slide out menu.

Now click on More Settings menu or button in the slide out menu. The last option in the drop down should be the option to remove the panel named Remove Panel. You can also right click on the hamburger menu button while the slide out is open to see the remove or delete panel. The keyboard shortcut to remove the panel is Alt+D, Alt+R.

If you don't see the menu entries mentioned above, then it is probably because you have locked the widgets. The widgets should be unlocked in order for you to add, delete and update them.
