how to reduce image size using any photo editing software
A high resolution image or photograph usually also have a very high file size. If you are planning to upload the image to a website to share or just using it on your webpage or blog a page, then the image size becomes a problem. A large image size is not desirable in many situations.
- When used in a webpage or blog page it makes the web page load slower
- Many websites do not allow upload of very large images
- Sharing of images using email and social networks becomes much faster and easier
There are several ways you can reduce the size of the image file, without completely compromising on the quality of the image. Theoretically, there is always a degradation in quality of the image when you reduce image size (and thus the image information) but it is usually very difficult for the human eye to detect this quality reduction. In situations that I mentioned before that is usually the case. In case you do plan to use the image to print high resolution in poster size then you do want to keep the image as it is.
First of all, you should figure out why exactly you want to reduce the size of the image and eventually what it is going to be used for. Get a general idea about how big you want the image dimensions to be and what is the desired image size that you want to reduce it to. For example, you want to use the image in a blog page which contains 4 other images and you might want the image to be 250 x 250 pixels in dimensions and keep the size of the image to under 20kb.
There are some software and websites which will take the image and reduce the file size for you. This generally works in many cases but also have a couple of drawbacks. It requires that I install another software on all the machines that you work with, in addition to the photo editing software that I have already installed and use. Uploading the image to a third party website is something I avoid usually for various reasons including trust and security. Also, uploading a large image takes time which is what I plan to avoid in the first place.
Most of the tips I provide below needs no more that the current photo editing software you have. The functions you might need should be readily available in almost all of them. I use GIMP for most of this, but you could use any photo editor such as Photoshop, Picasa or showFoto.
Crop Image to Better Suit Your Needs
Take a look at the image and see if there is any part of the image you can do without for your purpose. If you could crop some part of the image which is not relevant to your usage, it will reduce the file size by a good chunk.
Reduce the Image Dimensions
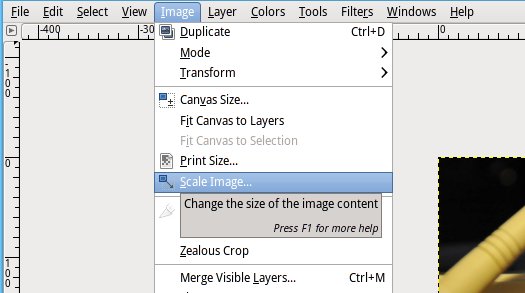
If you have an idea about the dimensions that is required, then reduce the image dimensions to match that. If you plan to use the image on a website, choose dimensions so that the image matches the final dimensions on the webpage. This will make the webpage load faster as the web browser will not have to resize the image to dimensions specified.
When scaling the image to a different dimension, remember to preserve the aspect ratio of the image. This will make sure that the final image does not look skewed, stretched or distorted in any way.
Reduce Colors in the Image
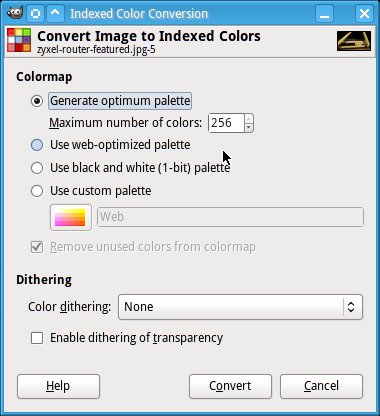
Black and white or Grayscale photos are obviously smaller than the color versions. You probably want to preserve the colors in the image, but you could always reduce the number of colors used in the image and the color depth of the image.
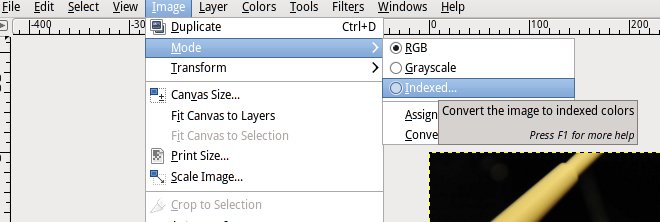
For GIF or PNG image format, you can convert the image from True Color to Indexed Colors, this will reduce the image size by only storing information about the colors that are used in the image.
Reduce Image Quality
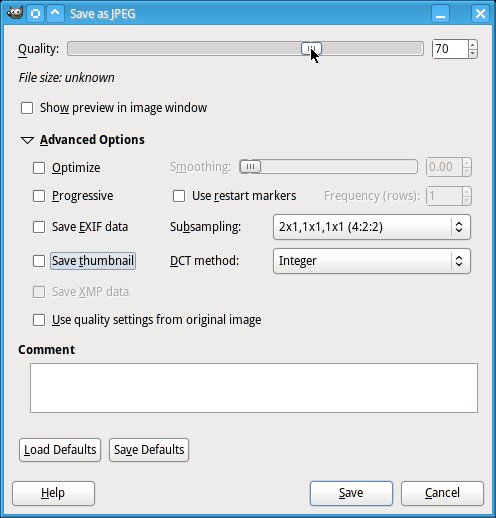
When saving the image in JPG, you can choose the quality of the image. Quality is inverse to file size, so the lower the quality you are willing to live with will give you a smaller file size. Choose a lower level of quality to drastically reduce the file size. And always check the file afterwards to make sure that the quality is acceptable.
In addition to reducing the quality, you can also reduce the image resolution or the pixel density of the image.
Flatten the image
In the case of image formats such as jpg which supports a transparency or alpha layer, you can flatten the image. This will get rid of all the layers in the image and reduce it to a single layer and remove the transparency layer.
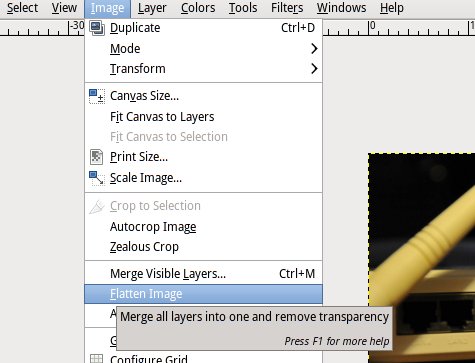
Remove exif data stored in the image
If the image has been taken using a digital camera, it is possible that there is a fair bit of EXIF data embedded in the image. You can choose the remove this data to further reduce the size of the image. This is possible to do by de-selecting the check box in the save dialog.
Choose appropriate image file type/format
Choose an appropriate image file format for your image. Depending on the image, different formats will have different file sizes. Converting the image to different formats and comparing the file sizes is a good idea. There are some guidelines that you can follow to choose the "correct" file format
- JPG (JPG) format is good for larger photographic images, fine artwork and full color images
- GIF is better for logos and animated images
- PNG is better format for flat color images, logos, button etc
When using a lossy format like JPG, do all your modifications in the original high resolution format before saving or converting the image. Avoid saving the file multiple times as this may result in a higher loss of quality more than you might have anticipated.
You can perform all of the above steps in any photo editing software such as Photoshop or Gimp. It is worth mentioning that there are several web based alternatives available to perform many of the above functions, but you seldom get the level of control over the image as doing it yourself.
Keep a copy of the original before performing any of the above file size reduction techniques. Just in case, you mess up and start over….
While reducing the image size would decrease your page load times and increase your SEO, it is equally important to tag your image with appropriate descriptions in the alt and title tags in order to further increase the SEO.
