how to install or update a wordpress theme
One of the most important component of the WordPress framework is the theme. The most important function of the theme probably is to decide the look and feel of the website. But it also have other implications such as influencing various SEO factors. A badly-coded or outdated theme can negatively affect SEO which makes it important to keep your theme updated.
There might be several different reasons for you to install a new theme or just re-install or update an existing theme. The most common reason is that there is a newer version of the theme available, or you might just want to change the look and feel, and have already found a better WordPress theme than the one that is currently being used.
Whatever be the reason, always read through and follow the instructions that comes with the theme. We will enumerate the different ways you can install a theme to your WordPress blog or website. As noted, the instructions that come with the theme will supersede the steps below…
Search and Install
Wordpress.org hosts a whole lot of free themes for the WordPress platform. If you plan to use one of themes, they are very easy to find and install right out of the box from the WordPress interface. They have a large collection of more than 2800 different themes to choose from.
This is simple enough to do from the site dashboard…
Steps
- Go to your WordPress Website Dashboard
- Click on Appearance and then Themes
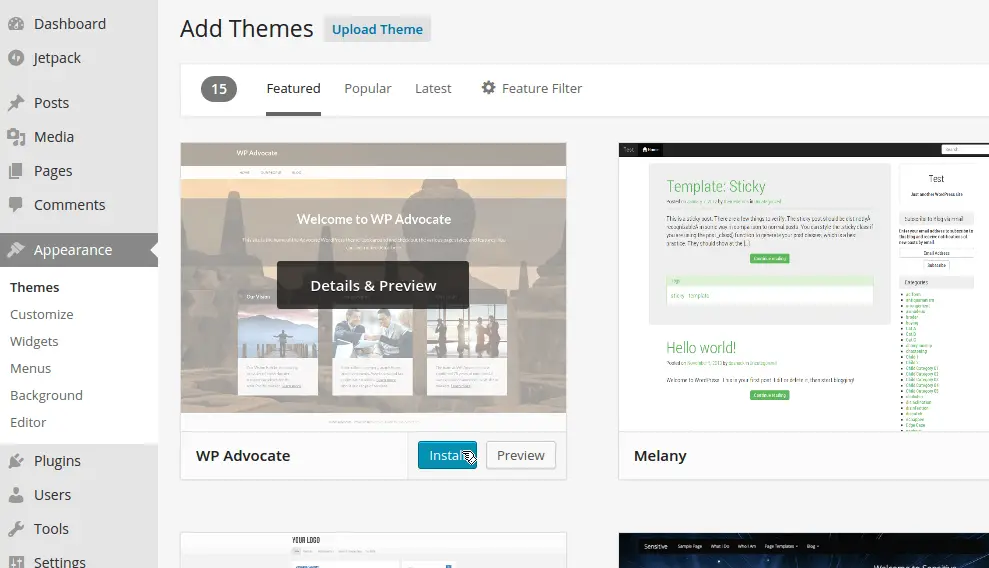
- Click Add New button at the top of the page
- Find the desired theme by either filtering or searching
- Hover over the theme to see the install and preview buttons
- Click Install button to install the theme

Manual Updates
While search and install works well for free themes from WordPress.org, you will need to manually download and install theme that you get from other sources. This is true for premium themes and themes you buy from third party vendors.
WordPress themes are always distributed as zip archive files. You can download them to your local hard disk, just as you would download any other file. Once you have downloaded the theme, you have two options in installing it manually: 1) Using the upload interface in WordPress dashboard or 2) Unzipping it to the themes folder manually.
Upload using the WordPress interface
You can access the WordPress dashboard interface and then upload the distributed zip file.

Steps
- Go to the WordPress website dashboard
- Click on Appearance and then Themes
- Click on /Add New /button at the top of the page
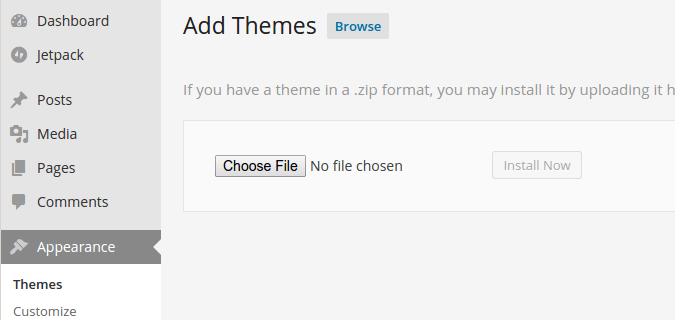
- Click on the Upload Theme button at the top of the page
- Click on the Choose File button to browse and choose the theme file
- Click Install Now to install the theme
Unzip to themes/ folder (FTP or cPanel)
If for some reason, you are unable to use the WordPress dashboard then you can upload the file using either an FTP client or the cPanel interface provided by your website hosting provider. When using this mode of transfer, you will need to decide whether to first unzip (or extract) the theme locally or to extract it on the server. It all depends on what kind of access you have to your host machine.
I recommend unzipping the theme archive locally on the machine and then uploading the folder recursively to the web host machine. This reduces the need to access archive tools remotely which is more error prone. Anyway you do it, the final state of the process is that the unzipped contents of the theme ends up in the WordPress themes (wp-content/themes) folder.
The WordPress framework stores all the available themes in the folder named /wp-content/themes . You should be able to find this folder under the WordPress installation folder. The process of transferring the file is the same as you do for any other file. Open your favorite FTP Client and then transfer the entire theme folder to the server under the said name.
If you have command line access to the server, then you can upload the zip to the server (using either the FTP client or cPanel) and then extract the file remotely into the /wp-content/themes folder.
Automatic Updates
Once you have the theme installed, then you will be able use update feature to update to the latest versions as and when it becomes available. Most third party themes, including both free and paid versions should provide you this feature by default.

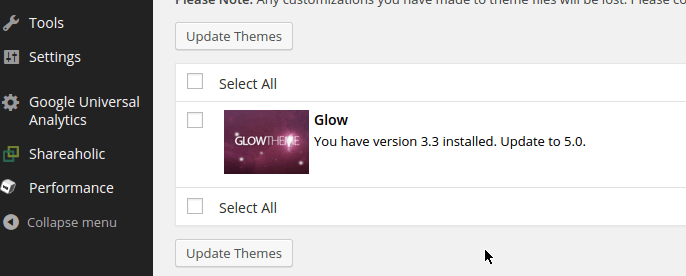
This is usually a one-click upgrade process, just as with plugins. Select the theme you want to update and click on Update Themes button. Follow the instructions that follow.
Activating the Theme
Once you have successfully installed a theme, the next step is to activate it. Activating the theme will cause the website or blog to render using the newly activated theme. This is an immediate action, although it does provide you with a preview option to test it out first.
- Go to the WordPress website Dashboard
- Click on Appearance and then Themes
- Hover over the theme you want to activate
- Click on Activate to activate (or Live Preview to test)

Again, this is a one-click process….just click on the link that says Activate.
Troubleshooting
It is not uncommon to find that your theme is not rendering correctly or even not appearing at all even after installing and following the steps. There are several common mistakes that could have happened during the installation process. Here are a list of some easy troubleshooting steps to weed out the common mistakes if an error do occur (no matter which set of steps you followed)….
Extract the zip: The final state of the installation process is that you have a unzipped and extracted the contents of the zip file into the themes/ folder. Check the contents of the folder (usually using the File Manager in cPanel) and make sure that it has been extracted and you have just not copied the zip file into the folder. Correct Folder: Again using the file manager, make sure that the zip file has been extracted into the correct folder. The themes should be listed under the folder named, [wp install_folder]//wp-content/themes// Correct Sub-Folder/Theme Name: Check the theme name in the folder. Ideally, every theme has a separate folder under the themes/ directory and has the same name the theme name. Sometimes, it is possible that you have uploaded or extracted the files into the top themes/ directory rather than under a sub-directory. For example, if your theme name is Glow, then folder should be /wp-content/themes/glow and all the files underneath that. Correct Files: You can check the contents of the sub-folder to verify that all the files have been uploaded correctly. You can compare the file names and sizes with a locally extracted copy of the theme. It is quite possible that some files may have been corrupted either during the upload or extraction process. Incorrect Zip file: Sometimes, third party themes which are /.zip files are again archived within another zip file which includes other files such as documentation, read me and licence. You might have uploaded the top level zip and not the actual theme .zip which is packaged inside. This could also happen if you followed the file transfer method.
If you still cannot find anything wrong with the installation and figure out why it is not working, check the theme zip to see if there is a Readme or Installation instructions bundled within. Sometimes, premium and professional themes can have customized installation procedures on top of the general instructions.
If all else fails, delete the theme folder that you created under the themes/ folder. Follow the steps and try again. It is possible that something was corrupted in the file transfer or you missed a file completely. After re-installation test if there is still an issue with the theme. If there is, then check theme website to find if this is known issue with the theme. You can try searching the WordPress forums, theme specific forums or just try googling….
Still no luck?, ask for help from either the theme developers or WordPress community…
